Facial contouring is a technique in which makeup enhances and shapes the facial structure. It was originally designed for catwalk models and photo shoots, but is now a part of many women’s daily routines.
For me, contouring is subtly defining one’s features and for it to be elegant it should be barely noticeable. With the right tools and neutral colour tones you can create the illusion of a slimmer jawline, a sculpted nose, chiseled cheekbones or defined eyes.
Contouring isn’t just shading with darker shades; it also encompasses applying lighter colours, highlighting, to define you.
I find that before any of my clients try to contour their face, it’s important for them to understand the tools of the trade. For most novice ladies, I suggest starting with creamy products, as they are easy to blend.
Always stick to matte bronzers and highlighters. You can always add shimmer later when you are more comfortable with the process.

Invest in some good brushes. Ideally, it would be good to have an angled contour brush or a foundation brush, a smaller brush for more detail and a brush to blend the edges of the shading and highlighting.
Blend, Blend, Blend. If you still struggle with harsh lines and a brush isn’t do doing the job, try using a beauty blender or a foundation sponge in a rolling or dabbing motion. Sometimes a damp sponge works the best.
Colour tone is important. I recommend picking colours suited to your skin tone, ideally 2 shades lighter for a highlighter and 2 shades darker for a contour. This really gives the illusion of shadow.
Now that you have the basic tools, you are able to start your contouring journey. Let’s have a look at the best way to contour.
Discovering your face shape first
With most of my clients, the question that then comes up is “I don’t know my face shape?” So I ask them to stand in front of a mirror and I take an eye pencil or lipstick, if you’re daring, and I trace the outline of their face on the mirror. This is an easy for you to do yourself and don’t worry the eye pencil or lipstick comes off easily. It’s with this outline that most women can easily identify their face shape.
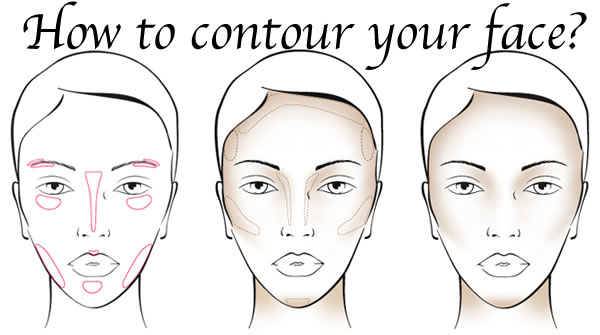
![How to discover your face shape | 40plusstyle.com]() How to contour for each face shape
How to contour for each face shape

Face Contour Highlight Blush
Round Sides of jaw, temples and the neck area Centre of the nose, cheeks, chin and forehead Just under the cheekbones
Long Forehead near the hairline, lower cheeks and chin Above the cheekbones and temples On the cheekbones
Square Sides of jaw and temples Centre of the nose, cheeks and chin On the side of the cheekbones
Heart/triangle Temples and chin Lower cheeks on jawline On the cheekbones
Oval Sides of jaw and temples Chin, temples and above the cheekbones On the cheekbones
Here are some visuals c/o Makeup Forever (you can find their contouring set here)


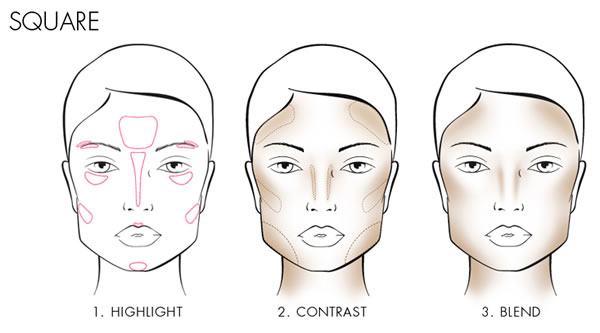
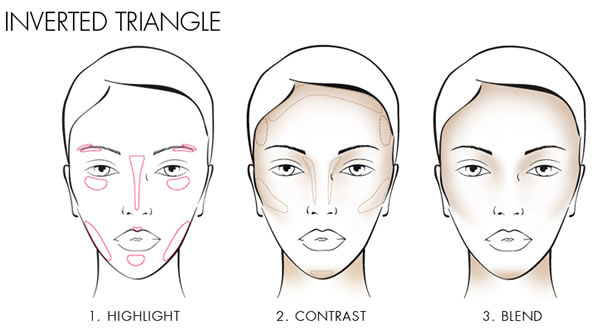
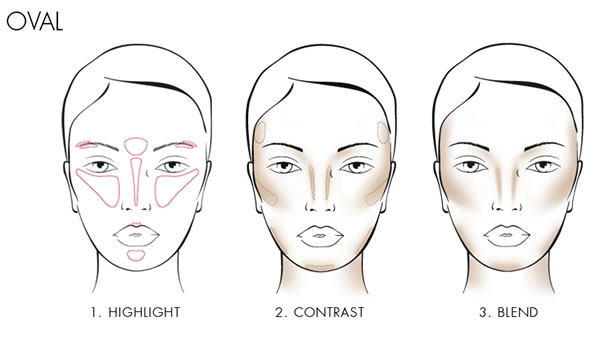
See how it’s done!
I recommend watching Lisa Eldridge’s Effortless Contouring video.
What I like about the video is that she shows you the basics of what I would call the “elegant” version of contouring with a cream product. The outcome is not like the very defined and dramatic versions you see floating around the Internet.
This is a fantastic starting point to your contouring adventure and as you get confident you can delve more into the depths of shading by trying the little tip she gives at the end for your lips.
So the most important tips to remember are:
- Less is more
- Subtle is elegant but defined
- Don’t forget to add some colour to your cheeks
- Practice, Practice, Practice!
Have you ever tried contouring?
 Kelly is 40+Style’s makeup and beauty expert writer. She is a professional makeup artist currently residing in Singapore. For more information or bookings contact her through her website.